Salesforce Integration Guide
This guide explains how Lingora connects to Salesforce, how to set up and authorize a connection, and how to retrieve and deploy metadata directly from your org.
Two Modes of Operation
Lingora supports two ways to work with Salesforce translation files depending on your tier and preferences.
Mode 1 — Upload-Based (All Tiers)
No Salesforce connection required. This mode works for any Lingora tier.
- Export XLIFF or STF files manually from Salesforce Translation Workbench (Setup > Translation Workbench > Export).
- Upload the exported files to a Lingora project.
- Translate and review using Lingora's workspace.
- Download the translated files from Lingora.
- Import the translated files back into Translation Workbench (Setup > Translation Workbench > Import).
This mode gives you full translation capability without granting Lingora any access to your Salesforce org.
Mode 2 — Connected App (Studio & Partner Tiers)
Lingora connects directly to your Salesforce org via OAuth 2.0 and uses two APIs:
- Metadata API (SOAP) — retrieve and deploy translatable metadata (Custom Labels, Fields, Flows, etc.)
- REST API — query and write-back Knowledge Article translations (__kav records)
Key capabilities:
- Retrieve translatable metadata automatically — no manual export required
- Deploy approved translations directly back to your org — no file handling required
- Knowledge Articles — query published and draft articles, translate rich text HTML fields, and write back as draft translations
- Supports sandbox and production orgs
The rest of this guide covers Mode 2 setup and usage. For Knowledge Article-specific workflows, see the Knowledge Articles guide.
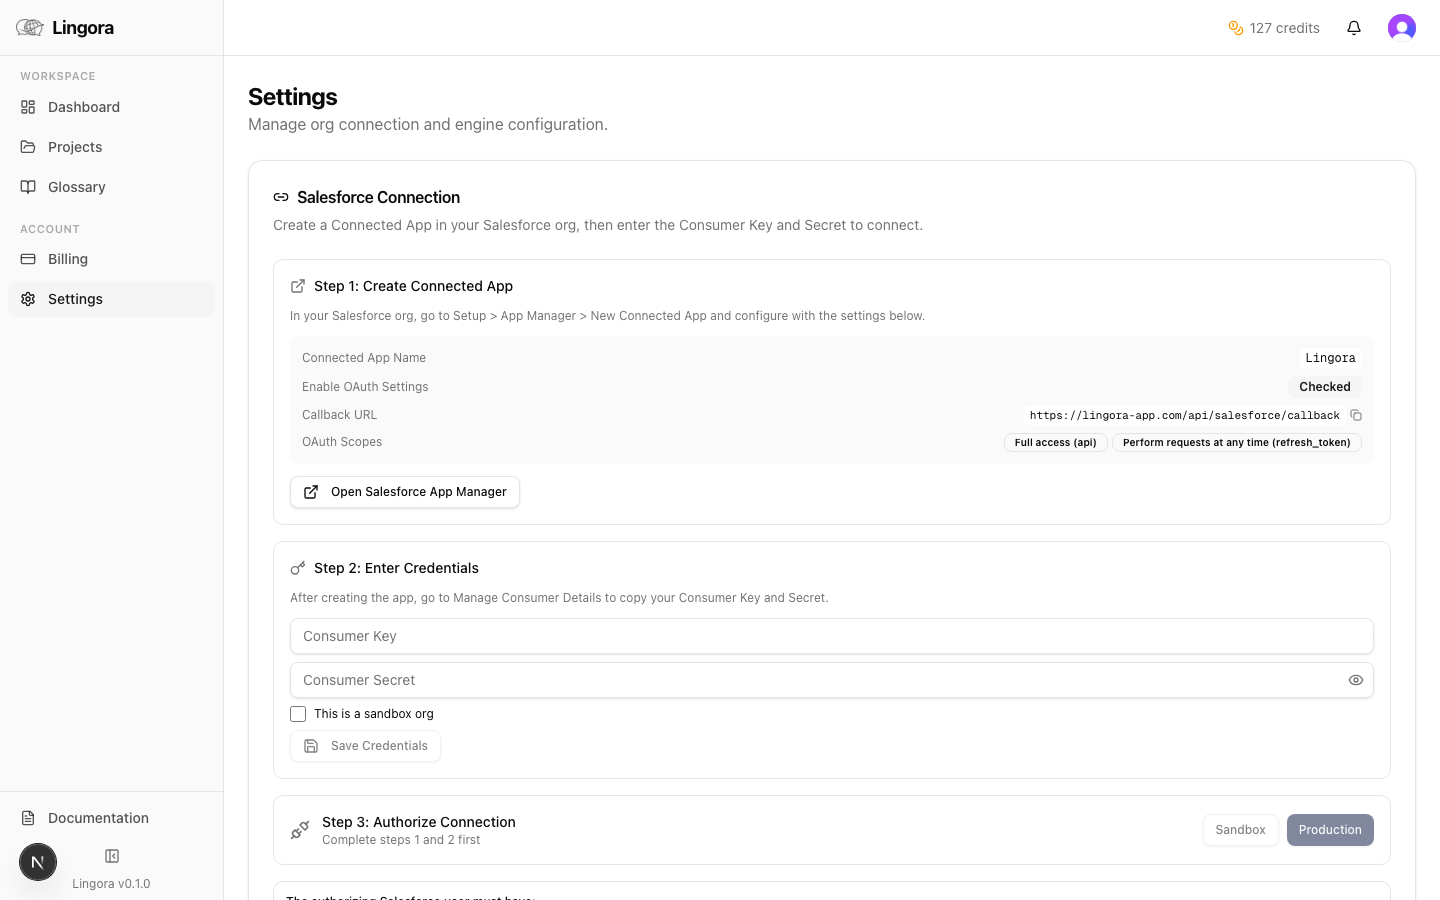
Setting Up a Connected App in Salesforce
Before connecting Lingora to your org, you need to create a Connected App in Salesforce. This gives Lingora a set of OAuth credentials it uses to request authorization.
Prerequisites: You need Salesforce admin access.
Step-by-step
-
Log into Salesforce Setup (click the gear icon > Setup).
-
Navigate to Platform Tools > Apps > App Manager. On newer orgs, this may appear as External Client Apps.
-
Click New Connected App (or New External Client App).
-
Fill in the required fields:
Field Value Connected App Name Lingora TranslationAPI Name Lingora_TranslationContact Email Your email address -
Scroll to the API (Enable OAuth Settings) section:
- Check Enable OAuth Settings.
- Callback URL: Copy the callback URL from Lingora's Settings page. It will be displayed there in the Salesforce Connection section. The format is:
https://your-lingora-domain/api/salesforce/callback - Selected OAuth Scopes: Add the following two scopes:
Access and manage your data (api)Perform requests on your behalf at any time (refresh_token, offline_access)
-
Click Save. Salesforce may take a few minutes to activate the Connected App.
-
Once saved, open the Connected App and copy the Consumer Key and Consumer Secret. You will enter these in Lingora.
Newer Salesforce orgs: The App Manager interface has changed in some org editions. If you see "External Client Apps" instead of "App Manager", the same OAuth fields are present — the navigation path is slightly different.
Required Salesforce User Permissions
The Salesforce user who authorizes the connection must have the following permissions. Lingora displays a checklist of these requirements in the connection UI before you begin authorization.
| Permission | Purpose |
|---|---|
| API Enabled | Allows any API access to the org |
| Modify Metadata Through Metadata API Functions | Required for retrieve and deploy operations |
| Customize Application | Required to read certain metadata types |
If any of these are missing, the OAuth flow will succeed but subsequent retrieve or deploy calls will fail with an insufficient privileges error.
Connecting Lingora to Salesforce
Click-path: Sidebar > Settings > Salesforce Connection section
- Enter your Connected App's Consumer Key and Consumer Secret in the corresponding fields.
- Toggle Sandbox if you are connecting to a sandbox org (test.salesforce.com). Leave it off for production orgs (login.salesforce.com).
- Click Connect to Salesforce.
- You will be redirected to the Salesforce login page. Log in with an account that has the required permissions listed above.
- Review the OAuth permission screen and click Allow.
- You will be redirected back to Lingora Settings. The connection status changes to Active and your Salesforce instance URL is displayed.
At this point, Lingora holds encrypted OAuth tokens for your org. The tokens are AES-256 encrypted at rest and are never exposed in the UI, logs, or API responses.
Retrieving Metadata
Click-path: Projects > select a project > Retrieve from Salesforce
Retrieval pulls translatable metadata from your Salesforce org and converts it into translation bundles inside your Lingora project.
What happens during retrieval:
- Lingora builds a metadata package manifest listing the types to retrieve.
- It calls
metadata.retrieve()via the Salesforce Metadata API. This is an asynchronous Salesforce operation. - Retrieve progress is shown in the Job Monitor. Large orgs may take several minutes.
- Once complete, Lingora downloads and parses the retrieved ZIP, creating translation bundles identical to those produced by a manual file upload.
Supported metadata types:
| Metadata Type | What it contains |
|---|---|
| Translations | Custom Labels, Flow definitions, Quick Actions, Custom Tabs |
| CustomObjectTranslation | Field labels, help text, picklist values, record types |
| GlobalValueSetTranslation | Global picklist translations |
| StandardValueSetTranslation | Standard picklist translations |
Incremental retrieval: If you run retrieval again after translating some units, Lingora merges the new metadata with existing bundles. Already-approved translations are preserved.
Deploying Translations
Click-path: Projects > select a project > Export > Deploy to Salesforce
Deployment pushes your approved translations back to Salesforce as metadata, replacing the source strings with translated equivalents.
What happens during deployment:
- Lingora assembles all approved translation units into Salesforce metadata XML, using the correct file structure for each metadata type.
- It creates a deployment ZIP with the directory layout Salesforce expects.
- It calls
metadata.deploy()withrollbackOnError: true— if any component fails, the entire deployment is rolled back. No partial deploys. - The deploy job runs asynchronously. Monitor progress in the Job Monitor.
- When complete, the results view shows:
- Success count
- Failure count
- Error details for any rejected components (component name, error message, line number where applicable)
Always test in a sandbox first. Deploy to your sandbox org before deploying to production. If errors appear, fix the flagged translation strings and redeploy.
Known Limitations
| Limitation | Detail |
|---|---|
| Flow rich text | Flow rich text labels appear in STF exports but Salesforce rejects them on import. Translate plain-text Flow labels only. |
| Custom app descriptions | No Metadata API equivalent. These must be translated directly in Translation Workbench. |
| Large deploys | Run asynchronously — do not expect instant results. Monitor via Job Monitor. |
| Language codes | Salesforce uses underscores (en_US). Lingora normalizes to BCP 47 dash format (en-US) internally and restores the underscore format on export. No action needed. |
| Sandbox refresh | After a sandbox refresh, the OAuth tokens for that sandbox are invalidated. Reconnect using the Settings page. |
Troubleshooting
| Issue | Likely cause | Solution |
|---|---|---|
| OAuth fails with "invalid_client" | Consumer Key or Secret is incorrect | Re-copy both values from Salesforce Setup > App Manager. Watch for trailing spaces. |
| "Insufficient privileges" on retrieve | Connected user is missing required permissions | Ensure the authorizing user has API Enabled, Modify Metadata, and Customize Application permissions. |
| Connection status shows "Expired" | OAuth token expired or revoked by Salesforce admin | Click Reconnect on the Settings page and re-authorize. |
| Deploy fails with component errors | One or more translated strings are malformed or invalid | Open the error details in Job Monitor, fix the flagged strings in the workspace, and redeploy. |
| Sandbox connection fails at login | Wrong login URL | Ensure the Sandbox toggle is turned ON in Lingora Settings before connecting. |
| Retrieve job stuck in "Running" | Salesforce async job delay | Salesforce retrieve jobs can take several minutes on large orgs. Wait and refresh Job Monitor. If stuck for over 30 minutes, cancel and retry. |
Tips
- Always start with a sandbox. Validate your translations in a sandbox org before deploying to production. Rollback is automatic on failure, but a clean test run is faster than diagnosing deploy errors.
- Monitor the Job Monitor. Both retrieve and deploy operations are asynchronous. Check the Job Monitor (Sidebar > Jobs) rather than waiting on the export screen.
- Keep Consumer Key and Secret secure. These credentials grant OAuth access to your Salesforce org. Do not commit them to version control or share them outside your team.
- Reconnecting does not lose data. If your connection expires, reconnecting on the Settings page restores API access without affecting your existing projects, translations, or Translation Memory.
- Token-containing strings are protected. Salesforce merge fields (
{!...}), format tokens ({0},{1}), and HTML tags are automatically protected during translation. They are replaced with safe placeholders before any engine call and restored in the final output.